Needle felting is a very simple craft that is both easy and inexpensive and is an excellent cottage hobby as it takes little space, allows one to work slowly (when you have the time) and on a small scale. The lovely thing about 3D felting is that its soft and lightweight and you can do it anywhere. Even if you feel you have zero artistic ability, needle felted critters always seem to have an undeniable charm to them, making them very rewarding to do!

Felting
Felting is the act of tangling/matting many loose fibers together, creating a non-woven structure. The most common materials to felt are wool, fur, or hair. Felting can create fabric-like sheets or three-dimensional forms depending on the felting method you employ; such as using heat, moisture, great pressure, and/or barbed needles.
Needle Felting
 Needle felting (as you may have guessed) uses a barbed needle. The needle has many little notches in it so it grabs and tangles the hairs as you push the needle into a ball of wool, and back out again. Because the needle is dragging fibers to and fro, you'll feel a little resistance as the needle goes in and out. This poking is the basic movement for needle felting, it's an oddly satisfying repeated stabbing motion.
Other Materials
 The other materials required to needle felt are roving (wool that has not been spun into yarn), a thick foam or cardboard mat (measuring 4x6", about .5" thick), and possibly a thimble or two ...or three!
Getting Started
Making a Felt Ball
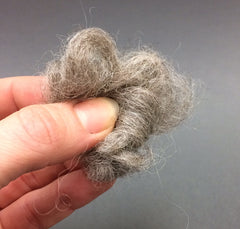 Wad up some of the roving and hold it between your thumb, index, and middle finger like this...
It doesn't matter how much wool you start with as we can always add more volume later. Take the wad of roving, hold it in place on your foam pad and begin stabbing through the wad and into the pad like so...
This is where the thimbles can come in handy. Although this can be a meditative or calming activity, if your attention strays from what you're doing, you will poke your finger eventually.
In very little time, the wad of loose hairs will begin to stay together on their own. Begin to rotate the wad as you poke it, pinching and rounding areas as needed until you have something self-contained and ball-like.
Making a Felt Skeleton - Attaching Felted Pieces Together
There's two basic ways of attaching felted pieces together.

 Option 1: leave a part of one ball loose and frazzled, like a ball with a skirt. Poke the needle through the skirt to attach it to the other ball (repeat as needed until all loose ends are poked down). This option allows you to seamlessly attach two elements together and gives a very durable and secure bond between separate elements. I used this technique to attach the head to the body...
I also used this method for attaching the legs, arms, and ears to the body like so... 
Option 2: finish both balls, leaving nothing hanging loose. Stack one on top of the other and poke the needle directly through one ball and into the other, repeat as needed until they're attached.

This method doesn't create as strong of a bond between elements but does preserve a crisp seam and allows elements to keep their original shape. used this technique to attach his poofy cotton tail to his bum.

Once individual elements are felted together, your critter will begin to take form and then the sky is the limit in terms of shape, colour, detail and the eventual size. You can continue applying wads of roving and felting it directly onto the felt-ball-skeleton you've created. Continue to fill in areas and add volume as needed.
Have fun and wear thimbles!