There can be any number of reasons why a stretched canvas will end up baggy, loose, wrinkled or dimpled, but it isn't the end of the world. Sagging can happen during shipping because of environmental conditions in different climates, namely humidity. This does not mean the canvas is defective or unusable! There are several ways to get a stretched canvas tight as a drum again.

Professional vs. Economy Canvas
These days, most artists (hobby or professional) seem to buy pre-stretched canvas as opposed to stretching their own canvas. Buying a pre-stretched canvas seems fast and easy however there are countless brands of pre-stretched canvas available and in huge variations of quality. The differences can be seen in the weight of the canvas used, the type of wood used in the stretcher bars, the quality of gesso (primer), and the tension of the stretch.
As with most things in life, you get what you pay for. A true professional quality stretched canvas will be tight and ready to paint on right out of the shrink wrap, no prep necessary, but you will be paying more for this quality. Economy canvases can suffice (even for a professional artist) but you shouldn't be surprised that it may take some finessing to get it up to spec before commencing painting.
Shrink It
The woven material that we call "canvas" is almost always 100% unbleached cotton duck, which shrinks like nobody's business.
The "shrink it" method works on any cotton canvas, but works best on canvas that hasn't been painted on yet.
- Using a spray bottle, mist very hot water over the entire back surface of your canvas. Do not soak.
- Using a flat hand, gently rub the moisture beads into the weave
- Dry with heat, immediately. You can use a hair dryer, prop it up near a hot air vent or wood stove, or set in a sunbeam on a hot day.
| Pros | Cons |
| Works very fast | Not a permanent solution |
| Costs nothing | Not the best solution for dimples |
| Not recommended for oil paintings | |
| Not recommended for linen |
Soaking = bad things!
If you soak a painted canvas mold could potentially develop between your primer and paint layers, risking discolouration at best and canvas rot and delamination at worst. (Delamination means your painting literally falls off the canvas.)
Although this method helps a bit with flattening a dimple, it's not the best long-term solution for repairing a dimple.

<== This is a dimple
Shrinking a new canvas using water will restore the canvas' tension long enough to get down the first layers of fast drying paint (acrylic, ideally). The paint film itself then acts like a band-aid holding the canvas fibers in the shrunk position.

Stretched canvas can also be made with a linen duck, instead of cotton. Linen can be identified by it's darker colour, more coarse and irregular texture, and it’s price: linen is 3 to 5 times the price of cotton canvas. Linen also doesn't shrink like cotton does so this method is not recommended for linen.
Canvas Re-Tensioner Product

A liquid canvas re-tensioner is a purpose-designed product that reduces the appearance of sagging, ripples and dimples in stretched canvas, leaving a tight and flat surface. When applied to the back of a canvas, it causes the canvas fibers to shrink slightly, then penetrates them with a binding agent to retain the tension after it dries. These products are acid-free and dry clear so it won't affect the look of the finished piece. Re-Tensioners can be applied only to the problem area or evenly across the entire back surface.
| Pros | Cons |
| Works fast | Not suitable for an oil painting |
| Permanent, long-term fix | Costs money |
| Great for spot treatment of dimples |
Canvas Keys

Manufacturers of canvases (even the high quality ones) have recognized that canvas sagging during transit is a real and continuing concern so they often provide a way to correct this by including “canvas keys”. These are thin wedge-shaped pieces of wood or plastic, like shims, that when placed in the corner slots of the stretchers, will tighten and bolster the frame itself, therefore, tightening the canvas stretched on it. If your new canvas doesn't include keys, they can be purchased separately. The key mechanism is really simple...
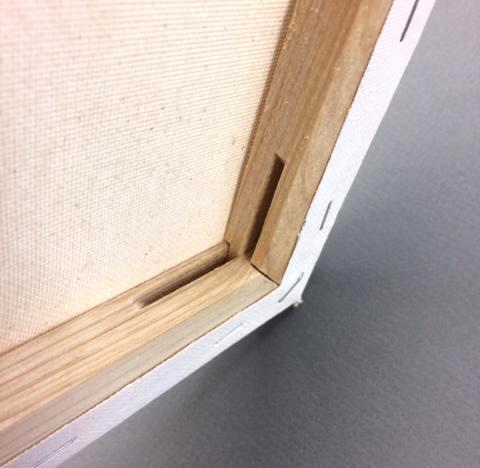


- Identify the key slots in each corner
- Fit in two keys per corner
- Gently tap into place with a hammer
| Pros | Cons |
| Immediate results | All four corners must be keyed to maintain 90 degree corners |
| A long-term fix | Keys can slip out of place during shipping or just over the passage of time. (Gluing them in place helps but if any further adjustments are needed, then you’re out of luck) |
| Can be adjusted or further tightened after the painting's completion | Not all canvases have key slots (Apollon Gallery Profile canvases do not) |
| Low to no cost |

Re-Stretch It
When all else fails (or if you just want to cut straight to the most durable and permanent solution) you can always remove the canvas from the frame and re-stretch it. This can be done with any stretched canvas (painted or not) with visible staples at the back. It's actually a very simple operation but it requires a medium to heavy duty staple gun, staples, and an extra pair of hands is helpful (or workbench with C-clamps).

First, remove all staples from the stretched canvas
- Start in the middle of the first stretcher bar and place one staple in the center.
- Do the same with the bar directly across from the first one, pulling the canvas snugly as you place the staple in the center.
- Staple the center of the remaining two sides, pulling and tacking in place. Continue stapling, working from the center of each stretcher bar towards the corners on each side, pulling tight as you go. (A staple every inch and a half should be enough.) Tighten and staple opposing sides simultaneously for a wrinkle free stretch.
- The corners are done last. Gently fold tight and staple the corners as many times as necessary to get them to sit flush
| Pros | Cons |
| Extremely durable with excellent tension, like a drum | It can be difficult to re-align a completed painting on a stretcher frame |
| The most permanent fix | Requires specific tools (staple gun) and space and time |
| Requires some physical strength (re-stretching an already painted canvas is tough work) | |
| Pulling too hard can break a stretcher bar | |
| Doesn't help much with dimples |
Thanks for joining us! We hope all your future canvases are tight like a drum, but if they aren't, now you know what you can do!