Ever wanted to make your own jewelry? Polymer clay can do just that! Polymer clay is a great versatile craft material for people of all ages and all skill levels. In case you're wondering what that it is, it's the kind of clay you oven bake to harden (such as Fimo & Sculpey). You can be as complex or as simple as you wish with polymer clays. One fun way to use them is to make your own beads

Beads can be intricate or simple; whatever makes it a fun experience for you. Whether you want to make your own jewelry, or fun crafts with the kids, this can be a project for anyone. We'll show you a few techniques for making several types of beads... (There are some Adults Only instructions for the bits involving heat and sharp pointy objects.)
Materials:

- polymer clay of some variety (here I'm using Sculpey)
- A flat clean smooth non-porous table area with parchment paper taped firmly down. (The clays can leave stains while working with them so it's best to have your work area covered up.)
- a smooth hard non-porous roller (no wooden ones)
- either a fairly large sharp pin, knitting needle, or skewer
- a small, smooth, hard non porous slab (smooth is going to be a theme here) A small glass sheet from a cheap frame with tape on the edges can work.
- tin for baking in at the end. If you don't want to use your nice cookie sheets a disposable tinfoil one will work great. We will need it as hat......you'll see.
- some plain, not shiny paper
- a sharp, thin blade large enough to hold comfortably
- paper towel with rubbing alcohol (for cleaning tools and surfaces any time you see too much clay build-up)
- oven thermometer
There are many kinds of beads you can create so we will be showing techniques for three different beads here. Piercing of the beads will be shown at the end.
For the first bead, we'll start with a simple jelly roll bead. For many beads, what you will have to do is make what's called a cane; a roll of clay arranged in different patterns to achieve different kinds of looks.
Project 1 - Jelly Roll Cane:
Step 1:
Set up your work area with your flat, smooth, non-porous working surface and have your supplies handy.
Step 2 - Conditioning:
Pick out at least two different colours of clay. Highly contrasting colours work well for this one. To make them easily workable we will condition them first. (This is just kneading and squeezing them to warm up the clay.) These clays are made with plastic so if you've ever heated up plastic, you know it gets softer when warm; same thing here. Be sure in this process not to trap air bubbles (by folding it over) as these can pop during baking and ruin your project. (Keep that structural integrity field up.) Roll or squeeze the clay from different sides to soften it up. When it starts to feel softer and a bit warmer in your hands you're ready to go to.
Step 3:

Roll out each of your conditioned clays into a flat sheet, somewhat square in shape. It should be about 2mm thick, but you don't need to be too fussy.
Tip: start with the lighter colour first so it doesn't pick up bits of the darker colour while rolling it out. (You can clean your roller with a rubbing alcohol towel in between too.)
Step 4:
Place one sheet on top of the other with a gentle rolling motion, again making sure not to trap air bubbles.


You can take a knife and trim the edges to give yourself a more square shape. (Don't worry, you can use those end bits later)
Step 5:
Roll over the layered sheets with your roller to get out any air bubbles. Tuck in one end as shown and begin rolling up the sheets. It will look just like it's namesake dessert..... jelly roll, mmm. Leave one edge exposed just slightly so you can see the line. This is a handy marker to see if your cane is strait or twisted.


Step 6 - Reduce:
As you've probably noticed your jelly roll may be quite large now. We are going to reduce it by gently rolling it out. This is why we need that line to see if it's twisting while rolling (which we don't want). Twisting will ruin the pattern you've created inside the cane. Don't roll it out too small; we will need to skewer it later so keep it a reasonable size. Slowly and evenly roll it back and forth to lengthen the cane and reduce it's diameter.


Step 7:
Set aside your cane for a bit to let it cool off and stiffen up; refrigerators work great for this if you're in a hurry. Twenty minutes in the fridge or 10 mins in the freezer. Heat from your hands will have made it super squishy and pliable. If we were to cut into the roll right now the pattern would get distorted.

When the roll is cool and you're ready, take your blade and slice off a segment of cane. The slice itself can be a bead all on it's own so make the slice a thick one; 1/4 inch or more should do. You can also take thin slices and use them to cover the outside surface of a bead.
Or, reduce the cane to even thinner and cut into several lengths, stacking them together to create a repeat of the pattern. Roll them together gently and reduce, then slice as desired. Be sure to keep an eye out for air bubbles, we don't want those so keep your stacks tight. You can do this by rolling over top of them to press them together. If you do this on 4 sides you will end up with a square cane that you can slice up and use; or roll it back and forth to round it out again.

Don't be too worried if your end looks like this, it can just get cut off and used for another project; it happens to everyone. Also be prepared to get experimental. Some things may not turn out perfect the first time you try -that's ok.


Step 8 (optional):
If you're going with thin slices to make a pattern covered bead: roll out a small ball of leftover or scrap clay from your cane. To make a good round shape hold the ball in the middle of one hand (which will remain still) while moving the other hand over it in tight circles in one direction then the other will give a nice round shape.. Of course it doesn't have to be round, just be sure it's a good size to skewer and string later.


If you want to make sure that various beads are the same size, use a small cookie cutter tool to cut out equal amounts from a flat sheet of clay to use for your centers. Taking your thin slices, gently press them onto the outside of the ball. The ones I used here are kind of thick but they are easier to see. They don't have to cover every single bit so don't be worried about that too much. Using your finger tip smooth the edges down. Then once they're on we will carefully roll them between your palms using those same tight circles- but slowly.


Project 2 - Bull's Eye Cane:
This uses a technique referred to as a "skinner blend" (invented by Judith Skinner) but there is more than one way to do this. The teardrop blend here was invented by Cindy Lietz (Clay Ninja) and is much faster.
Step 1 - Set up:
Get out your supplies and set up your working area. There should be a clean and flat hard surface to work on that is covered.
Step 2:
Condition your clay. (See Project 1; Step 2)
Step 3:
Here we will show you how to make a blended colour. This just means we are taking two or more colours of clay and putting them together to make a gradient of colour.
Tip: Colours will mix together so keep in mind what colours you are mixing. If you mix blue, red and yellow together you will get brown so keep that in mind when choosing colours!
Take each of your colours and portion them out into even amounts. Roll each one into a ball between your palms. Once it's round roll it down to the edge of your palm where your pinky is and gently roll it between the two edges of your palms until it forms a teardrop shape.
When they're finished lay them opposing end to end as pictured. Gently squeeze to stick them together.


Step 4:
Take your roller and begin to roll them out into a flat sheet. Once it's getting thinner fold it in half, keeping your lines of colour vertically strait so they are still in line with each other. This is important to keep the same colour folding over itself. Roll it out flat and thin again. Repeat this process over and over.


To speed this up you can roll it up instead of folding in half. This is just like doing many folds at once. But keep those colours in line. You will begin to see the colours blend together with a gradual gradient. It will begin to widen more and more as you do this. Just squish it together a bit with your fingers at the ends to keep it from getting out of control while your blending. You will do this many, many times; so be prepared.


When you are happy with the blend, and be forewarned this will take awhile, take the strip you've created and roll it up very tightly; still keeping those colours in their rows. You should have created a round tube; now lay it out and roll over the top to flatten it out the length-wise way. This will be just like when you were blending it together but this time we are going to stretch out our blend into a long strip. This is just to stretch out the blend a bit more. As you roll, hold the end of the strip to keep it from sticking to the roller, as it will be getting very thin as you go.


Step 5 - Making A Cane:
Tuck in one end of your sheet so you have a little roll to start with. You could also add a little thinly rolled strip of that same colour to bulk it up. Start rolling up your sheet just like a little sushi roll until you reach the end. If you look at the end of the cane you will see the gradient you've made


Step 6 - Reduce:
When you have your cane rolled up it will most likely be quite bulky and short. We are going to lengthen and thin it out by gently rolling. It's important not to let the cane twist while your rolling because this will mess with the lovely pattern you've just created. Keep an eye on the edge of the clay (left exposed from rolling it up) to see whether it's twisting or not. When rolled to the desired size (remember you have to be able to skewer a hole in it later so don't go too small), set it aside to let it firm up by cooling off for a bit.
Step 7:
Once firmed up it can be sliced into a bead on it's own, rolled out further and doubled up or added onto a rolled ball as mentioned in the jelly roll project. See Step 7 & Step 8

Project 3 - Lentil Bead:
This one works really well with scrap bits from other projects so if you have leftover pieces from the other two you can use them here, so no wasted bits. Yay!
Step 1:
Take ends from other canes or bits from at least two colours of clay and roll them into a ball. It doesn't have to be perfect but rolling tight circles in the middle of your palm works well. When assembling your ball it's helpful to keep in mind that any colour on the equator of the little globe you just made will be drawn into the center like a little vortex.


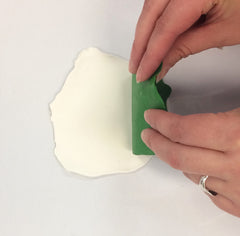
Step 2 :
You will need a small, flat, non-porous slab of some kind that you can hold. Acrylic works great and so does glass (no sharp edges! You don't need to julienne yourself!). Place your ball on your work surface and then take your slab and place over top, we're going to be rolling it in a special way. Make it level by holding your slab in both hands on either end so your fingers are touching the work surface like little table legs. Begin rolling in a circular motion clock-wise or counter clockwise. It doesn't matter which direction you pick but once you've picked a direction you must stick with it. Use even, medium sized circles applying very little pressure. Using smaller circles with more pressure will give you a flatter bead, bigger circles will give you more of a conical/diamond shaped bead.
Tip; it's very important to keep your slab level with your work surface as you roll. It's equally important to keep the circular motion the same size or you will get wonky shapes.
As you roll you'll begin to see the colors twist towards the center. (It's going to look like one of those striped mint candies.) If you start to see the ball's shape go astray adjust the pressure down on that side slightly until you see it round out again.

Bead Piercing... As Painlessly As Possible:
Step 1:
Take whichever bead you're going to be skewing and get it lined up directly under your line of sight as best as possible. Make sure the beads are cool and firm and have been sitting awhile. If they're super warm and squishy they'll deform when we try to pierce them. Putting them in a bowl of ice water, the fridge for 20 mins, or freezer for 10 mins works great. (Especially if the temperature of your workspace has reached apocalyptic levels) You may also wish to wear some latex gloves or whatever magic non-latex gloves are made of. This prevents fingerprints. Make sure you're looking straight down onto your bead.


Step 2:
Take your skewering instrument of choice and line it up with your best judge of the center of your bead. Very slowly begin gently twisting your needle downward.

When the needle is a tiny bit in hold up the bead to again judge if you're in the center. If not, remove the needle and start again. The hole can be smoothed over with your finger. Replace the bead directly under your line of sight so your looking down and return to twisting.


When you come through the other side pull the needle back in slightly to pull any puckering back in. If you're doing a lentil bead, hold it in your hand as pictured and be sure to use virtually no pressure. Coming out straight can be challenging so as you get near the end slow down. If you come shy of your mark just back out and flip it around to come at it from the opposing side. Place your needle where it was supposed to come out and gently twist in. The needle should fall into the tunnel you've made. Remember to be gentle as it is super easy to squish these guys.

Baking:
Step 1:
Get out your baking sheet or pan and cover the bottom with plain paper.
IMPORTANT SAFETY NOTE: Be very sure this paper is well inside the lip or sides of the pan so it does not touch any surface/element inside the oven. The Sculpey bead making kit came with this surface for baking on so I'm going to try out both.

Tip: Don't leave your beads on the tinfoil to bake as they will come out with flat, uneven shiny spots.
Step2:
You can leave your beads on their skewers and hang them on the edges of you pan. A foil pan will be easy to pierce or you can use a bit of tin foil to secure your needle ends on the edges of the pan. They can also just go on the paper to sit and bake, especially if you don't have skewers for them all.

Step 3:
Cover the top of your project with the foil baking pan. This will give a protective hat for your items, keeping them from toasting like marshmallows dropped in a campfire. Follow baking instructions for the time and temperature as per the package of your clay. All ovens vary in temperature so to get an accurate read it's a good idea to use an oven thermometer to see that the oven really is the temp it says. Too much and your project can burn, too little and it will be structurally unsound. Let them cool gradually in their little tinfoil cage, then string them up with wire, ribbon, string or whatever other jewelry product you like. There is no need to seal them once baked but you can coat them in a varnish or resin if desired.