Pressing flowers is a lovely way to remember a moment in time. Pressing flowers in a large heavy book (such as an encyclopedia) is one way of doing it, but it's a rather unkind thing to do to a book. If you press a fresh flower in a book, the flower will literally squish and permanently soil the pages of your book!

An actual flower press is a very simple, purpose-built contraption that is very easy to make
(and your books will thank you!).
The basic anatomy of a flower pressing apparatus is a sandwich of rigid layers, absorbent layers, and fresh flowers, all held in place with bolts and wing nuts which allow you to apply even, consistent pressure.
Materials:

- Masking tape
- Double sided tape
- A drill plus 1/8" and 3/8" wood drill bits
- Watercolour paper
- 5 x Birch 1/8" plywood sheets (5x7")
- 4 x Wing Nuts (1/4")
- 8 x Washers
-
4 x Carriage Bolts (3" x 1/4")
Regarding Watercolour Paper: If you have more time than money, you can use an inexpensive large format (20x26") sheet of watercolour paper (approximately $3 each) which can be cut down to the necessary size (4x6"). If you have more money than time, the pad of watercolour postcards is pre-cut to 4x6".
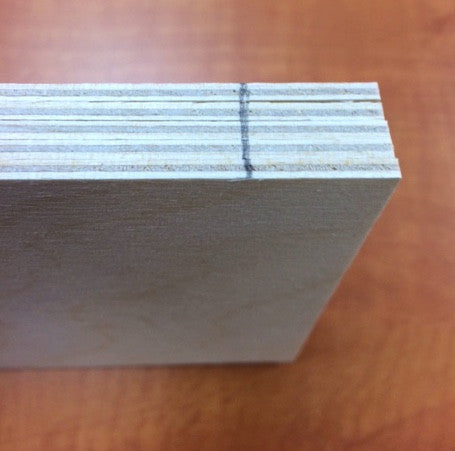
Step 1: Marking
- bundle the plywood and mark across one edge with a pencil, like so...

Step 2: Taping
- Align the birch boards in a stack and securely wrap all five boards with masking tape
- In each of the four corners, make a dot (approximately 1cm in from each side)
Step 3: Drilling
- Grab your drill and insert a 1/8" drill bit
- drill a "pilot" hole in each corner, where each dot has been placed (pilot holes will make it much easier to then drill a more substantial hole)
- switch the drill bits to the larger 3/8" (if you don't have access to a 3/8" bit, a 1/4" bit will work, but its not ideal... its a bit too snug to allow the threaded carriage bolt to slide freely through)
- drill through the pilot holes


Step 4: Affixing the Paper
Now that the holes are drilled, you can remove all the masking tape and separate the boards. You'll need to grab your 4x6" sheets of watercolour paper and double-sided tape as well.
When you lay the 4x6" sheet on the birch board you'll notice that the paper's corners intrude into the drilled holes.

- Using scissors, nip the corners of the watercolour paper so they're clear of the drilled holes
- tack the paper in place with the double-sided tape
The tape doesn't need to be a strong bond, it just serves to keep the papers from shifting about while you get your flower, paper & board sandwich in order.
Continue nipping edges and taping down watercolour sheets to both sides of the birch boards. (The birch boards that will serve as the top and bottom of the press only need paper on one side)

Step 5: Assembly
- Once the bottom board is finished, place a washer on each carriage bolt then thread the bolt through the drilled hole in each corners.
You will probably notice at this point that while nipping corners and attaching the papers to the boards, your boards were flipped over, turned around and mixed up and now the corner holes no longer match up when stacked... Never fear! This is where the pencil line from step one comes in very handy: Find the pencil marked edges on all the boards and align them, then begin to assemble the press, layering like this...


A helpful hint when pressing flowers: Layer bulky flowers together on one layer, and lay thin leaves and flowers on another. The dandelion leaf (on the far right) is too thin to be pressed next to the thick dandelion flowers so it was moved to the next layer with other thin leaves and flowers.
When everything is assembled, place a washer and wing nut on each bolt and begin tightening. The washers on top and bottom will help distribute the pressure over a larger area, preventing the wood from splitting as you tighten the nuts.


The 3" bolts give you enough space to stack and press multiple layers of paper & flowers/leaves between birch boards, pressing dozens of flowers in one go!